About
Doctors & Staff
James Twede, MD
Grant Staples, MD
Katherine Wehlage, MD
Amber Long, PA-C
Kathryn Harrison, PA-C
Chelsea Burg, PA-C
Jennifer Burke, FNP
Tamara Wint
Bobbi Messelt, Aesthetician
Blog
Specials/Promotions
Events
Videos
Media
Before & After Gallery
DermaSpa RX
Products
Services
General Dermatology
Skin Cancer
Mohs Surgery
Skin Exam
Skin Conditions
Acne
Age Spots
Dermatitis
Diabetic Skin Care
Eczema
Fungal Infections
Hives
Hyperpigmentation
Keratosis
Lentigo
Lichen Planus
Melasma
Psoriasis
Rosacea Treatment in Denver, CO
Scarring
Shingles
Spider Veins
Sun Damage
Telangiectasia
Vitiligo
Warts
Cosmetic Consultation
Cosmetic Treatments
Injectables
Botox
Juvederm
KYBELLA
CoolSculpting
Profound
Acne Scar Treatment
Exilis ELITE™
Ultherapy
CO2RE
Fractional Laser
Intense Pulse Light (IPL)
Laser Hair Removal
Sclerotherapy
Spa Services
Chemical Peels in Denver, CO
Microchanneling
Dermaplaning
Facials
Microdermabrasion
Acne Lift Treatment
Light Therapy (NeoLTS)
Vivace
Medical Treatments
Photo Dynamic Therapy
Excimer Laser
TheraClear
Patient
Information
Patient Portal
Patient Forms
Online Payment
Financing Options
Cancellation Policy
Out of Town Patients
Contact
Schedule An Appointment
Locations
Careers
0 items
$0.00
303-761-7797
Book Online >>
Book Online
About
Doctors & Staff
James Twede, MD
Grant Staples, MD
Katherine Wehlage, MD
Amber Long, PA-C
Kathryn Harrison, PA-C
Chelsea Burg, PA-C
Jennifer Burke, FNP
Tamara Wint
Bobbi Messelt, Aesthetician
Blog
Specials/Promotions
Events
Videos
Media
Before & After Gallery
DermaSpa RX
Products
Services
General Dermatology
Skin Cancer
Mohs Surgery
Skin Exam
Skin Conditions
Acne
Age Spots
Dermatitis
Diabetic Skin Care
Eczema
Fungal Infections
Hives
Hyperpigmentation
Keratosis
Lentigo
Lichen Planus
Melasma
Psoriasis
Rosacea Treatment in Denver, CO
Scarring
Shingles
Spider Veins
Sun Damage
Telangiectasia
Vitiligo
Warts
Cosmetic Consultation
Cosmetic Treatments
Injectables
Botox
Juvederm
KYBELLA
CoolSculpting
Profound
Acne Scar Treatment
Exilis ELITE™
Ultherapy
CO2RE
Fractional Laser
Intense Pulse Light (IPL)
Laser Hair Removal
Sclerotherapy
Spa Services
Chemical Peels in Denver, CO
Microchanneling
Dermaplaning
Facials
Microdermabrasion
Acne Lift Treatment
Light Therapy (NeoLTS)
Vivace
Medical Treatments
Photo Dynamic Therapy
Excimer Laser
TheraClear
Patient
Information
Patient Portal
Patient Forms
Online Payment
Financing Options
Cancellation Policy
Out of Town Patients
Contact
Schedule An Appointment
Locations
Careers
0 items
$0.00
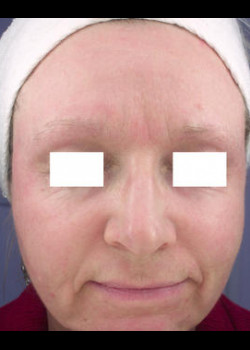
Before & After Gallery
Click Images below for a more detailed view.
Individual results may vary.
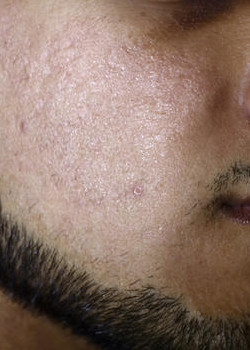
CO2RE
December 7, 2018
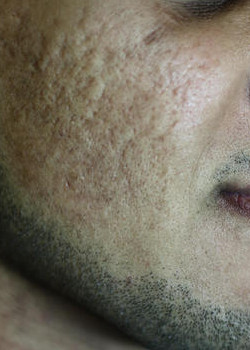
CO2RE
December 6, 2018
« Previous
1
2
3
Contact Us
About
DermaSpa RX
Products
Services
Patient
Information
Contact
0 items
$0.00
Phone:
303-761-7797
Englewood, CO
3701 S Clarkson St, Suite 400
Englewood, CO 80113
Directions >>
Castle Rock, CO
2356 Meadows Blvd, Briscoe Building, Suite 340b
Castle Rock, CO 80109
Directions >>
Lakewood, CO
255 S Routt Street, Suite 350
Lakewood, CO 80228
Directions >>
Englewood, CO
303-761-7797
About
Doctors & Staff
James Twede, MD
Grant Staples, MD
Katherine Wehlage, MD
Amber Long, PA-C
Kathryn Harrison, PA-C
Chelsea Burg, PA-C
Jennifer Burke, FNP
Tamara Wint
Bobbi Messelt, Aesthetician
Blog
Specials/Promotions
Events
Videos
Media
Before & After Gallery
DermaSpa RX
Products
Services
General Dermatology
Skin Cancer
Mohs Surgery
Skin Exam
Skin Conditions
Acne
Age Spots
Dermatitis
Diabetic Skin Care
Eczema
Fungal Infections
Hives
Hyperpigmentation
Keratosis
Lentigo
Lichen Planus
Melasma
Psoriasis
Rosacea Treatment in Denver, CO
Scarring
Shingles
Spider Veins
Sun Damage
Telangiectasia
Vitiligo
Warts
Cosmetic Consultation
Cosmetic Treatments
Injectables
Botox
Juvederm
KYBELLA
CoolSculpting
Profound
Acne Scar Treatment
Exilis ELITE™
Ultherapy
CO2RE
Fractional Laser
Intense Pulse Light (IPL)
Laser Hair Removal
Sclerotherapy
Spa Services
Chemical Peels in Denver, CO
Microchanneling
Dermaplaning
Facials
Microdermabrasion
Acne Lift Treatment
Light Therapy (NeoLTS)
Vivace
Medical Treatments
Photo Dynamic Therapy
Excimer Laser
TheraClear
Patient
Information
Patient Portal
Patient Forms
Online Payment
Financing Options
Cancellation Policy
Out of Town Patients
Contact
Schedule An Appointment
Locations
Careers
0 items
$0.00